Last updated . Written by the SIMO Securon team, Nagpur
To install a fixed knot fence, set out the line, concrete braced terminal and corner posts, let the concrete cure, run out the fabric, tension each line wire to 0.8 kN and fix it to every post. This guide follows SIMO Securon's installation manual for its Q-Knot™ and ZS-Knot™ high tensile knotted fence.
High tensile wire behaves differently from ordinary chain link (jali): it is stronger, springier and stores more energy under tension. Read the whole guide before you start, and download the installation manual for the site.
Safety. Wear gloves, eye protection and safety boots throughout. Never stand in line with a wire under tension or in front of a fence puller. Secure every cut end: a released high tensile wire can whip. Keep children and animals away from the work area.
Why it matters. A knotted fence is a system: its rated life depends on correct posts, bracing, joining and tension as much as on the wire. With correct installation, SIMO Securon is rated for 35 years or more (Alpha), 20 years (Zeta Nova) and 10 years (Pi), in C1 to C3 environments.
What do you need to install a fixed knot fence?
Fence puller
Tensioner
Wire twister
V-Clip
C-Clip
Fabric lock
M10 fastener
Cross-section of an L-shaped steel angle post.Angle post
QvikFixrr™ installation tools: a fence puller draws the fabric along the line before it is fixed; a tensioner, fitted at the terminals, brings the line wires to tension; a wire twister ties off the wires and makes the splice-and-twist joins; wire grip joiners grip the line wires. Fence supply orders of 2 km running length and above come with one set of the three tools free, for the project.
General tools: measuring tape, string line and marking pegs; a post-hole digger or auger; a spirit level; concrete mixing tools; wire cutters rated for high tensile wire; spanners for M10 fasteners.
Materials:
SIMO Securon fence fabric, in the grade and grid specified
QvikFixrr angle posts with standard 8.5 ft shafts: 50 x 50 x 6 mm for regular spans and 65 x 65 x 6 mm at terminals and corners; or concrete columns of at least 150 x 150 mm in high-grade concrete
Bracing struts and horizontal stays
QvikFixrr V-Clips and C-Clips (staples or clips for the stays), fabric locks and M10 fasteners
Wire grip joiners for the line wires, and wire tensioners for the terminals
Concrete, and gravel or crushed stone where the ground needs drainage
Walk the whole line first. Mark every terminal, corner, change of direction and gate before anything is dug. Every gate is two terminals, and every change of direction is a corner, braced both ways.
Perimeter: measure it. A square plot of 1 acre is about 255 m around; 5 acres is about 569 m.
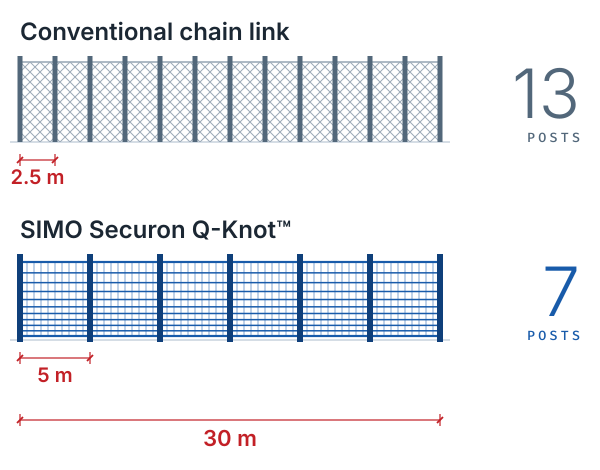
Intermediate posts: each straight run divided by the post gap. At 5 m, 569 m needs about 114 posts; conventional galvanised chain link at 2.5 m would need about 228.
Terminals and corners: count them from your plan; each gate adds two.
Fabric: each straight run divided by the roll length, rounded up: Alpha 50 m, Zeta Nova 30 m, Pi 100 ft (30.5 m), ZS-Knot 50 m.
Check the site first. Within 20 km of the coast, or on a chemically aggressive site (C4 and above), for example near chemical plants, fertiliser stores or industrial fumes? Stop and ask SIMO for a site-specific recommendation before ordering.
Step 1: set out the line
Run a string line between terminal positions, pulled tight at the height of the fence base.
Mark each post position along the line: every 5 to 6 m for Alpha, every 5 m for Zeta Nova and Pi.
Check the line is clear of buried services before digging.
Step 2: how deep should fence post foundations be?
Post
Foundation
Notes
Terminal (start and end)
At least 45 x 45 cm, 75 cm deep
Braced, with a horizontal stay to the first supporting post
Corner (change of direction)
60 x 60 cm, 75 cm deep
Braced in both directions
Intermediate
About 75 cm deep on average
Size and depth depend on the soil and the fence height: adjust them to the site, or follow the agreed drawing
A post is the fence height plus at least 50 cm, set into the concrete: the standard 8.5 ft shaft on a 6 ft fence gives about 76 cm. Use angle posts of 50 x 50 x 6 mm (65 x 65 x 6 mm at terminals and corners), or concrete columns of at least 150 x 150 mm. Place gravel or crushed stone at the base of a posthole where the ground needs drainage.
Step 3: how do you brace terminal and corner posts?
Diagonal brace at 45 degrees on every terminal post
Horizontal stay between the terminal and first supporting post
Terminal foundations at least 45 x 45 cm and 75 cm deep; corners 60 x 60 cm, braced both ways
Fabric tensioned only after the concrete has fully cured
Posts set at least 50 cm into concrete; concrete posts at least 150 x 150 mm
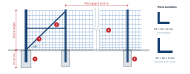
Terminal bracing, foundations and post sections for a SIMO Securon knotted fence. Every job is built to its agreed drawing.Installation drawing of a knotted fence: a terminal post with a 45 degree diagonal brace and horizontal stay, concrete foundations 75 cm deep, a post gap of 5 to 6 metres, and post sections of 50 x 50 x 6 mm (intermediate) and 65 x 65 x 6 mm (terminal and corner). Numbered callouts 1 to 5.Open the drawing full size: Installation standards: terminal bracing, foundations and post sections
Every terminal post is braced, because it carries the pull of every line wire. Corners are braced in both directions, one assembly for each line leaving the corner, on a foundation of 60 x 60 cm, 75 cm deep.
How do you fit a gate in a fixed knot fence?
Treat each gate post as a terminal: braced the same way, on a terminal foundation, so the weight of the gate never hangs on the fabric. Hang the gate only after the concrete has cured, and fit the top hinge with its pin pointing down, so the gate cannot be lifted off. Leave enough clearance for the gate to swing over the highest point of the ground, and check that it opens, closes and latches freely before handover. Gate size and fittings are specified for each site.
Step 4: set the line posts and let the concrete cure
Set each intermediate post plumb on the string line, checked with a spirit level in two directions.
Keep post heights even, so the fabric sits at a constant height.
Use rust-free posts only: a rusted post shortens the life of the whole fence.
Cross-section of an L-shaped steel angle post.
Do not rush this. Let the concrete cure fully before any tension goes on: tensioning early pulls terminals out of line and loosens the whole fence. Keep the concrete damp, and wait at least 7 days with ordinary Portland cement (OPC), or at least 10 days with PPC or another blended cement, or in hot, dry weather: the curing periods of IS 456. If in doubt, wait longer.
Step 5: run out, anchor and join the fabric
Unroll the fabric along the line, next to the posts, and stand it upright.
Check which way up it goes: on a graduated grid, the closest wires go at the bottom, where animals push and small animals try to get through.
Anchor the start at the first terminal with a flat bar fabric lock and M10 fasteners.
Join rolls on long runs by splicing and twisting the line wires together: no welding and no joint, and the twist leaves the coating intact. Never weld or joint the fabric.
Step 6: how tight should a fixed knot fence be?
Fit the fence puller to the free end and draw the fabric along evenly, so every line wire takes load together.
Bring the line wires to tension with wire tensioners at the terminal posts, using tension wire grips on the line wires.
Target: 0.8 kN of installed tension in each line wire (about 80 kgf). Check it with a wire tension meter on every line wire, near the middle of each tensioned run, and bring all the line wires to the same reading.
Watch the crimps between the stays: they act as springs and should stay visible, not be pulled flat.
Re-check the terminal bracing: it should not move as tension comes on.
Never stand in line with the wire or the puller while tensioning. Tension slowly and evenly, and wear eye protection.
Step 7: fix, tie off and add toppings
Fix the fabric to every intermediate post with QvikFixrr V-Clips or C-Clips; staples or clips for the stays.
Tie off the wires at the terminal with the wire twister; trim and turn in the ends.
Mount toppings on the post attachments: RTHT barbed wire strands, with concertina coil seated between them where specified.
On a ZS-Knot 4 x 2 anti-climb fence, keep the toppings continuous across every post, so there is no gap to climb through.
Step 8: inspect and hand over
Terminal and corner assemblies braced and not moving
Posts plumb, even in height and free of rust
Fabric the right way up, fixed at every post
Roll joins spliced and twisted; no welded or jointed fabric; cut ends turned in
Tension even along the run, with the crimps still visible
Toppings continuous where specified
Site cleared of wire offcuts and packaging
Care guidance handed to the owner of the fence
How do you look after a fixed knot fence?
Store rolls closed, dry and off the ground until they go up.
Walk the line after storms or impacts.
Keep fertilisers and chemicals off the fence.
Replace any rusted post early.
Never weld or joint the fabric, even for repairs. Join rolls only by splicing and twisting.
What you see
What to do
Fence sagging between posts
Check the terminal bracing first, then re-tension at the terminal
A terminal leaning
The bracing or foundation is undersized, or tension went on before the concrete cured: re-set it
Fabric dented after an impact
The crimps usually recover; check the clips at the nearby posts
A broken wire
Contact SIMO. Do not weld or joint it
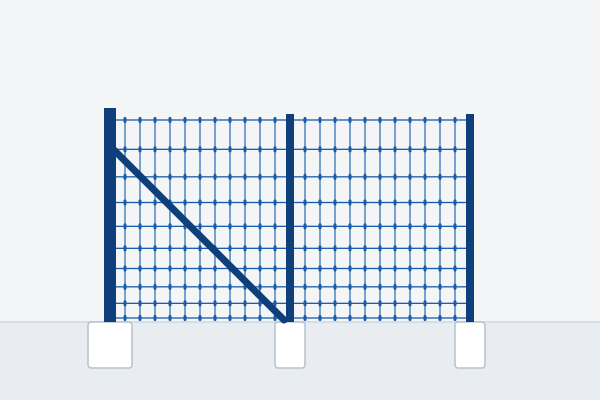
A bay of SIMO Securon Q-Knot fixed knot fence goes up between two posts 5 metres apart, with line wires closer at the bottom than at the top. Seen from above, an impact pushes the fence back, and the crimped line wires return it to shape. A close-up shows the knot locking a line wire and a stay at their crossing.
Download the installation manual
The 12-page installation manual has every step above with its drawings, and the care card fits on one sheet for the site.
Need a trainer on site? On a supply-only order, an on-site trainer can work alongside your team on tensioning, bracing and fixing, backed by instructional videos: see installation training. Or have SIMO Securon’s own crews install it: see fencing contractor.
FAQ
Fixed knot fence installation questions
What is the post spacing for a fixed knot fence?
SIMO Securon's fixed knot fence takes a post every 5 to 6 metres in Alpha, and every 5 metres in Zeta Nova and Pi, against every 2.5 to 3 metres for conventional galvanised chain link. Every corner, change of direction and gate post is a braced terminal on a larger foundation.
How deep should fence posts be set?
Terminal posts sit in foundations at least 45 x 45 cm and 75 cm deep, corner posts 60 x 60 cm and 75 cm deep, and intermediate posts about 75 cm deep on average, adjusted to the soil and the fence height. A post is the fence height plus at least 50 cm in the concrete.
How tight should a fixed knot fence be?
Tension each line wire to 0.8 kN, about 80 kgf, checked with a wire tension meter near the middle of each run, and bring every line wire to the same reading. The crimps between the stays should stay visible: they are the fence's springs, so do not pull them flat.
How long should concrete cure before the fence is tensioned?
Keep the concrete damp and wait at least 7 days with ordinary Portland cement (OPC), or at least 10 days with PPC or another blended cement, or in hot, dry weather: the curing periods of IS 456. Tensioning early pulls terminals out of line and loosens the whole fence.
Can I install a fixed knot fence with my own contractor?
Yes. On a supply-only order, SIMO Securon supplies the fence with matched QvikFixrr posts and fittings, and a trainer can work alongside your contractor's team on tensioning, bracing and fixing, backed by instructional videos. SIMO recommends supply and install by its own crews to most customers.
By splicing and twisting the line wires of the two rolls together. There is no welding and no joint, and the twist leaves the coating intact. Never weld or joint the fabric, even for a repair.
Want it installed for you, or a trainer on site?
SIMO Securon's own crews install anywhere in India once an order is confirmed. On a supply-only order, a trainer can work alongside your contractor's team. Call or WhatsApp us with your site and boundary length.